W3 Total Cache Settings, W3 Total Cache Settings in wordpress, w3 total cache setup, w3 total cache settings for woocommerce, w3 total cache SEO
Caching plugin is very important for any WordPress site. It makes your website super fast. Although there are many cache plugins available in the market, the best and most effective one is W3 Total Cache. The plugin is very popular among WordPress users for its functionality. And most of the pro bloggers use it.
Today in this article I am going to show you W3 Total Cache Settings.
There are a lot of settings in the W3 Total Cache plugin that can be intimidating to a new user, but this guide will make setting W3 Total Cache easy for beginners. If you properly configure W3 Total Cache on your WordPress site, it greatly improves your page load speed.
What is W3 Total Caches Plugin
W3 Total Cache improves your website loading speed and improves user experience. It also has Content Delivery Network (CDN) integration which reduces download times. Apart from this, it also offers file minification and GZIP compression to reduce the loading time.
W3 Total Cache has tons of customization. It is available in both FREE + PREMIUM version. You can super fast your website loading speed by using its free version also.
Why Use W3 Total Cache Plugin
Website loading speed is considered an important ranking factor. If your website takes more time to load, then your site will not be able to rank in the search results and visitors will not like to visit your site no matter how well you have written the article.
Even Google has said that Faster loading site gets good rank in search engine. Therefore, we use many techniques to improve the loading speed of the website – Best hosting, image optimization, CDN and cache plugins etc.
Here I will tell you about the best settings of W3 Total Cache so that you can improve the loading speed of your website and get a good rank in the search results.
W3 Total Cache Settings
You can download the W3 Total Cache plugin for free from WordPress.org. If you want, you can upgrade to the premium version but the free version is enough.
Before installing W3 Total Cache, you need to take care of one thing. There should not be any other cache plugin installed in your site. If any other cache plugin is installed, delete or deactivate it first.
To install the plugin, click on WP Dashboard >> plugins >> Add New. After this search W3 Total Cache and then install it in your blog or website. After installing and activating the plugin, you will see a Performance option on your dashboard.
So let’s start configuring it now-
W3 Total Cache is a very advanced cache plugin and it has a lot of options which might confuse you but don’t worry, here I will tell you its best settings.
First of all, you have to click on General Settings option, here you will see many options.
1. Page Cache Setting
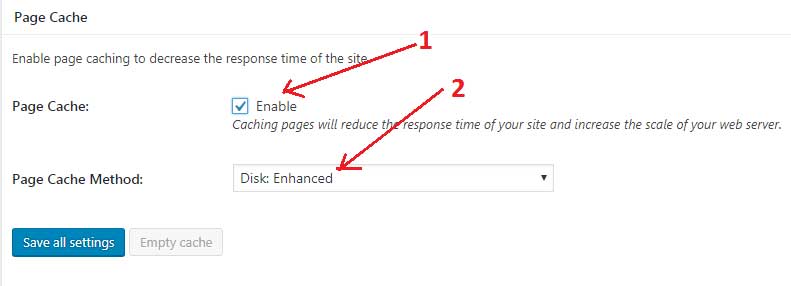
- Page cache: Enable this. Page cache generates static HTML files from your WordPress blog and when a visitor visits your blog, it serves the generated static HTML files to the visitors instead of heavier WordPress PHP scripts. Due to which your site loads super fast and also reduces the load on the server.
- Page Cache Method: If you are using Shared Hosting then in this option, select Select Disk: Enhanced option. Then click on Save all settings.
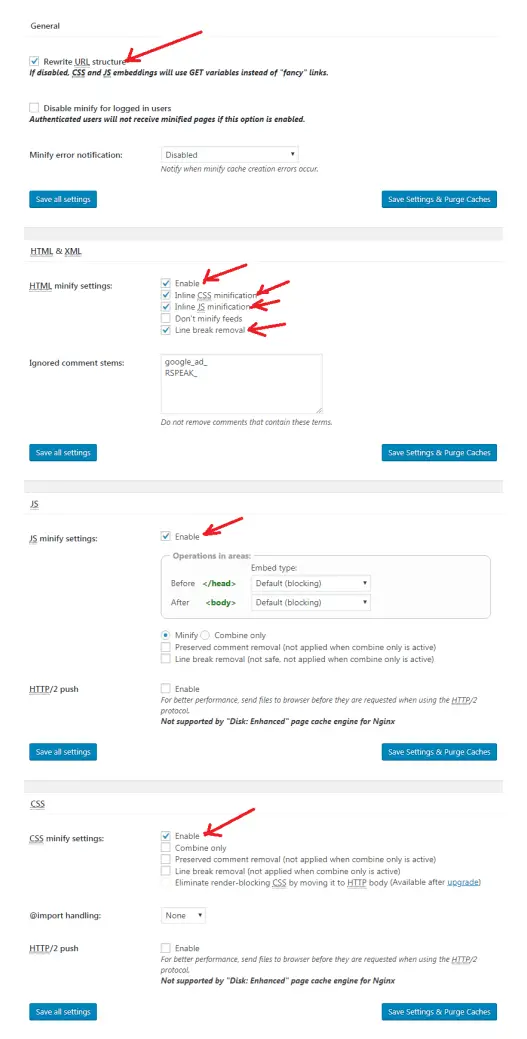
2. Minify Setting
Reduces server load by compressing JavaScript and CSS files in your site. So enable this option and leave other settings default.
After activating the Minify setting, visit your site, if there is no problem, keep it enabled, if the site is facing problem, then you disable it.
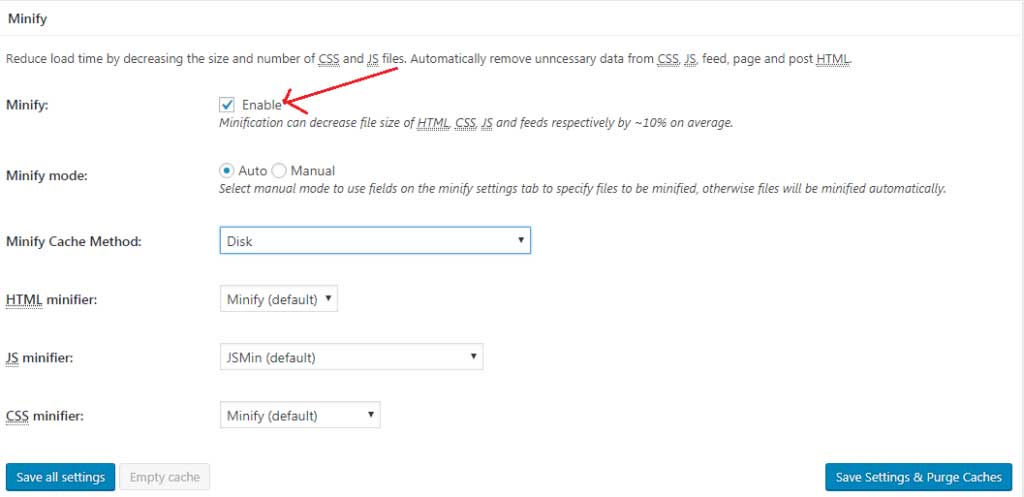
If you are using Cloudflare minification to minify Javascript and CSS in your site, then you should disable it.
3. Database Cache & Object cache
In both these options you have to select Disable. Bluehost and Hostgator recommend disabling the database cache and object cache.
- Database Cache: Disabled
- Object Cache: Disabled
4. Browser cache
In browser cache settings, you have to select enabled. This reduces your server load and also reduces the response time.
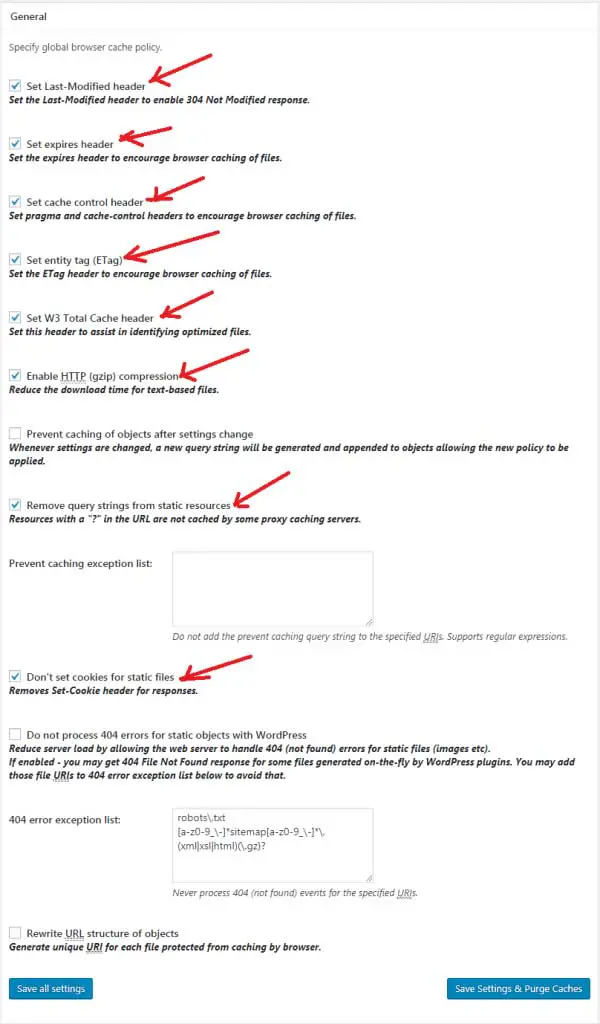
Click Save all setting and leave all other settings default.
W3 Total Cache Advanced Settings
After completing the General Settings tab, you can configure the advanced settings of the plugin. This will make your page load speed even faster.
Page Cache W3 Total Cache Setting
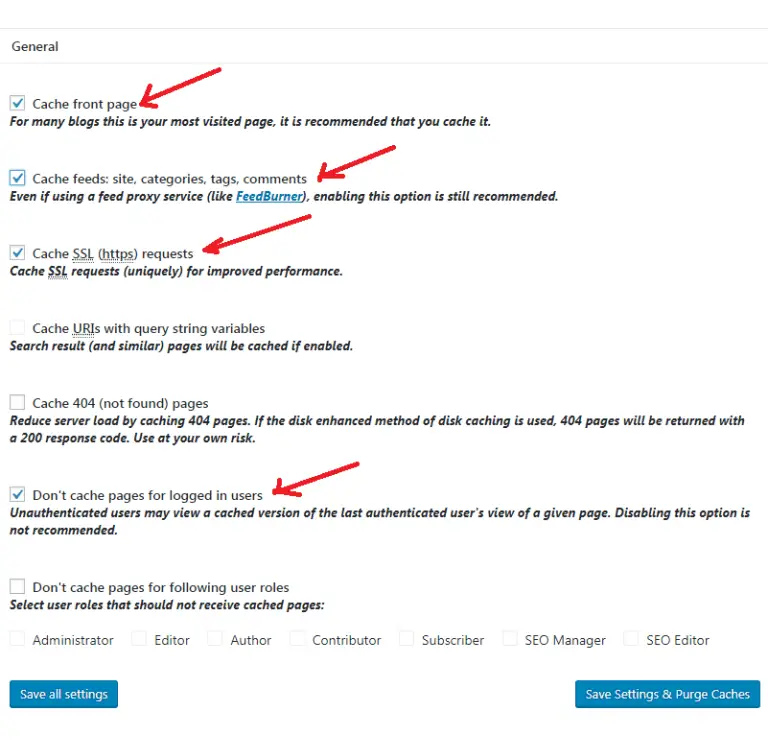
- Enable cache front page
- Enable cache feeds
- Enable cache SSL (https) requests
- Enable don’t cache pages for logged in users
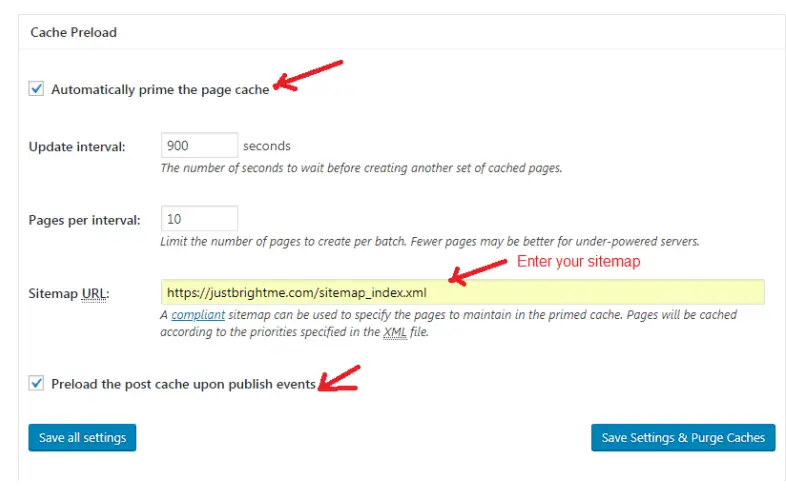
Minify – W3 Total Cache Setting
Database Cache
leave default
Object Cache
Leave Default
Browser Cache
Enable the option shown in the image above:
- Set Last-Modifier Header
- Set expires header
- Set cache control header
- set entity tag
- Set W3 total cache header
- Enable HTTP (gzip) connection
- Remove query string
- Don’t set cookies for static files
Finally, click on Save settings and Purge cache button.
Extensions
W3 Total Cache supports some popular extensions (AMP, Yoast SEO, Genesis Framework, Cloudflare and Feedburner). Enable the extension you are using.
I hope, by following this article, you have easily configured W3 Total Cache settings on your site.

